Frontend 01 - Install all the things! ... and stuff
 Installing requirements: Node and Serverless Framework
Installation of Node, if you dont already have it, is really simple. They offer multiple options for most systems whether you want to use an installer or a package manager. This has been well covered all over the place as well as in the official Node documentation. I’d suggest going here and picking the method that works best for you.
Use a package manage or download an installer
Once you have completed the nodejs install its is really simple to install the Serverless Framework.
Feel free to read all about it at serverless.com or just run the following command:
npm install -g serverless
I would recommend going back when you have time and reading through the docs. There is a massive amount of information that we dont even scratch the surface of in this tutorial.
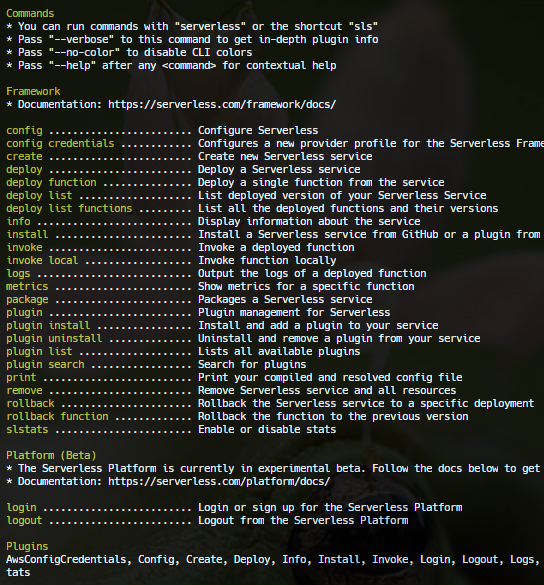
If your install was successful you should be able to execute the serverless command and see output like this:

Create AWS admin user
First thing you need here is an AWS account. If you have one, were good to go. If you have not yet signed up you can do so here: AWS signup
Once you’re logged in we need to create new credentials that will allow your Serverless Framework install to access your AWS account to create and configure resources.
The standard method for doing this is creating a serverless-admin user with programmatic access credentials only. This user has full admin control of your AWS account so it is important you keep the credentials safe. I may try in the future to do a tutorial on how to customize the access given to this user so it only has what it needs.
Step one: go to IAM … from the main AWS console services page you should see IAM under Security, Identity & Compliance If you have used it recently it will be in the top section. If you cannot find it, simply type IAM in the search box and click it when it comes up:

From here we need to click on users so we can create ours. Select it from the left navigation or the center section:

Next, click the big blue Add user button at the top of the screen:

For User name we’ll follow the standard recommendation and use serverless-admin
also make sure you check the box for Programmatic access … then click the blue Next: Permissions button at the bottom:

Click on the Attach existing policies directly box and tick the checkbox for AdministratorAccess. You can use the search feature if it is not at the top of the list for some reason … then click the blue Next: Review button at the bottom:

You should see a summary of what we just did like this. Click the blue Create User button at the bottom to continue:

You should see a success message with your new users credentials. You can save them locally using the Download .csv button or you can copy paste them from the interface here. You will not be able to retrieve them from AWS after you leave this page so make sure you save them (and keep them safe) or you will have to regenerate new ones.

Now that you are armed with admin user credentials we can configure Serverless Framework to use them on your behalf.
Configure Serverless Framework
this part is really simple.
run the following command in your console:
serverless config credentials --provider aws --key {key} --secret {secret} --profile serverless-admin
You’ll need to swap out {key} and {secret} with the Access key ID and Secret access key you just got from AWS.
What this does is add a new file in your ~/.aws/ folder where it stores your credentials under a profile called serverless-admin
Create your serverless app
Alright, we’re almost done with setup.
Create a project directory and cd into it.
e.g.
mkdir serverlessapp-tut
cd serverlessapp-tut
the command to create the boilerplate app is as follows:
serverless create --template aws-nodejs --path frontend
you should get some output like
_______                             __
|   _   .-----.----.--.--.-----.----|  .-----.-----.-----.
|   |___|  -__|   _|  |  |  -__|   _|  |  -__|__ --|__ --|
|____   |_____|__|  \___/|_____|__| |__|_____|_____|_____|
|   |   |             The Serverless Application Framework
|       |                           serverless.com, v1.32.0
 -------'

Serverless: Successfully generated boilerplate for template: "aws-nodejs"
cd into the new frontend directory and you should see 3 files, a base .gitignore, handler.js and the main serverless.ym file.
Go ahead and delete the handler.js file as we wont be using it in this tutorial.
I’d suggest opening the whole directory in your favorite editor at this point.
code .
or atom, sublime… whatever floats your boat.
Now… the serverless.yml is where all the magic happens. Open it up now.
If you’re not familiar with yaml it may be a good idea to read up on it or look at some yaml specific tutorials. You don’t absolutely need to understand its structure or syntax to continue with this tutorial but I would highly recommend it so you can have the best understanding possible. Maybe start here: YAML: Quick Introduction and come back when you feel you have a good enough understanding of the basics.
Alright… now in our serverless.yml file we’re going to add everything we use. Go ahead and delete all the commented code.
Your file should now look something like this:
service: frontend

provider:
  name: aws
  runtime: nodejs8.10

functions:
  hello:
    handler: handler.hello
We don’t need the functions section so get rid of it too.
Change the service value to something appropriate, I’m using serverlessapp-frontend (I also moved it below provider out of personal preference)
Now your file should look something like this:
provider:
  name: aws
  runtime: nodejs8.10

service: serverlessapp-frontend
We’re ready to move on and start actually building our app.